I wrote most of this back in April 2009, but never finished it. The stage 1 build was actually completed in May 2009 so I will be writing the final installment of this build in the very near future.
FOR PART ONE OF THIS BUILD, CLICK HERE.

To me, parts selection of any build is probably one of the most critical aspects of building a car. Other aspects are attention to detail, ECU tuning, suspension and chassis, etc. but that's another story for another day. The parts chosen for a build as a whole are probably more important than the individual parts by themselves. In part one of this build, I promised explanations of why I chose to use the parts I did. Some of the part names are also hyperlinks to take you somwhere for more information.
As a quick refresher since I wrote part 1 almost 18 months ago, this stage 1 build is basically everything you can do around a stock block and cylinder head without changing any internal components of the block or cylinder head. Why keep the stock internals? Because you can for a 500-600hp build as long as the engine is properly tuned and maintained. You can drive it, drag it, beat the crap out of it, and it still shouldn't break despite being almost 20 years old now. In fact, I'd rather keep the stock components than use many of the off the shelf American forged aftermarket components if I was planning to keep it under 600hp.

HKS GT2530 Twin Turbos: The 2530s are the ultimate turbos for the 500-600hp range. A single turbo with properly selected components can come close, but they still cannot match a pair of 2530's low end response and part throttle power modulation that you need on the street or a tight, small road course. Plenty of turbos can do the 500-600hp thing, but the 2530s are so perfectly sized for the RB26 that they can magnify the entire powerband if your engine is tuned correctly with the right parts. XS spends some time enlarging the wastegate port and even more time radiusing the aread where the wastegate port meats the volute which results in a signficant reduction in backpressure. The inlet of the turbine housing is also matched to the factory Nissan multi-layer stainless steel gasket.
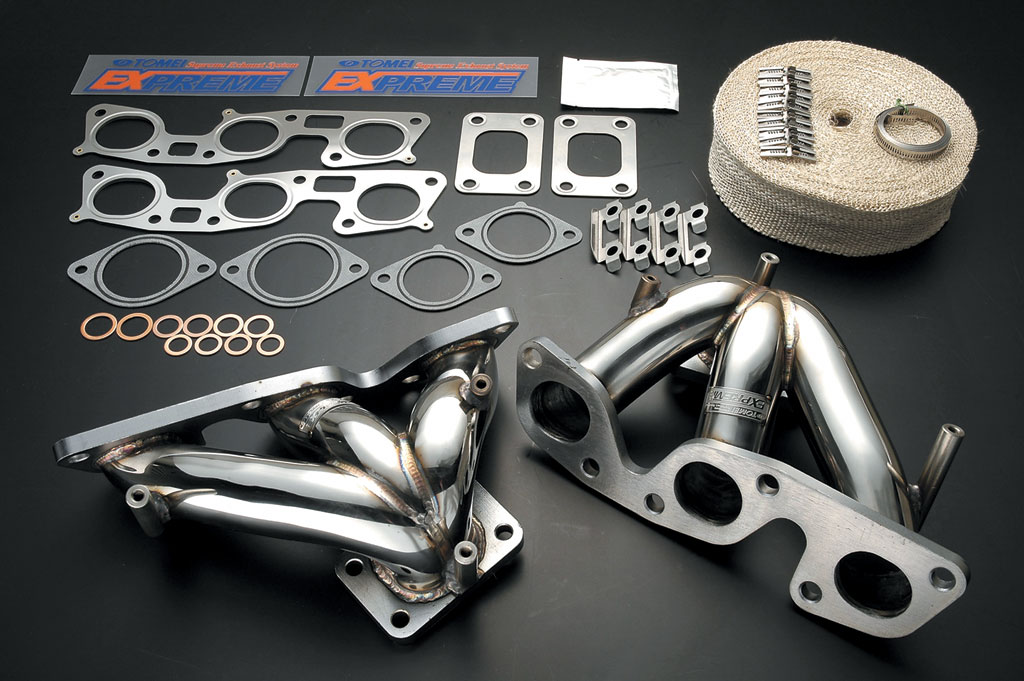
Tomei Expreme Exhaust Manifolds: I always use these on RB26s because I have found them to flow the best. The runners are one piece lost wax stainless castings and the welds are purged from the inside as well. They are probably the most durable, high flowing RB26 stock location exhaust manifolds I have found to date. The only catch is that you need to check the head flanges for flatness when you remove them from the box. Most of the time you're cool, but if you've R&R'd a pair of turbos on a Skyline, then you'll not want to do it again because a flange wasn't flat. Depending on whether or not the cylinder head has had port work done to it or not, XS spends some time port matching the inlet of the exhaust manifolds. The outlet is matched to the factory Nissan multi-layer stainless steel gasket.
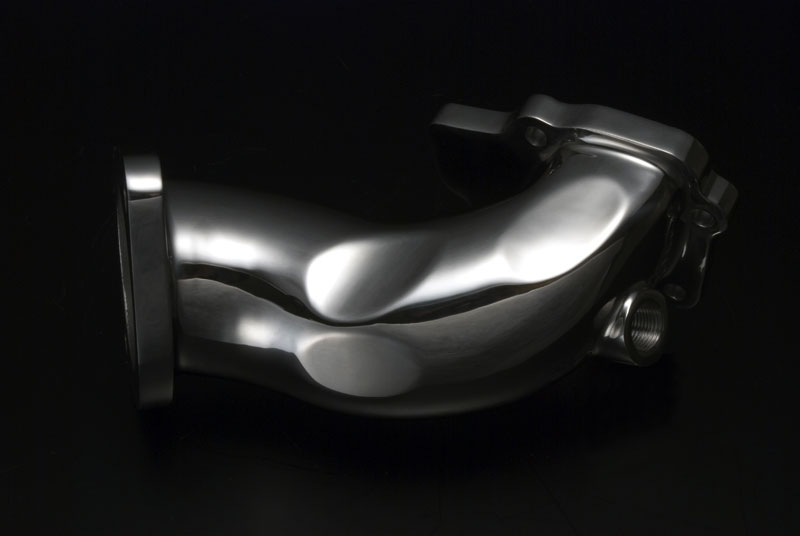
Tomei Expreme Turbine Outlet Pipes 76mm: I always use these on RB26s because they also flow the best. The ones pictured above are the older models, but the newer units are also cast in one piece using the lost wax method. Their full size 76mm (3″) diameter is also a must on any RB build whether mild or wild. A twin 3″ downpipe is also ideal for the RB26, but you'll only find twin 3″ downpipes at smaller JDM tuning shops such as Do-Luck, Midori Seibi and Autech Tsukada. My downpipe is an older Do-Luck twin 76mm downpipe that merges into 90mm (3.5″) before meeting the cat-back section.
Do-Luck Stainless Exhaust System: My Do-Luck exhaust system came with the car when I bought it in Japan. It is a complete exhaust system that starts from the downpipe to the rear muffler. Like I said above, the downpipe has twin 76mm tubes and merges to 90mm at the bottom of the car. The original exhaust was 90mm, had two sub-mufflers, and a pretty large rear muffler. I had Peter at XS cut off the two sub-mufflers (sub-mufflers are ghey and restrictive) and replaced them with straight 3.5″ tube. I kept the Do-Luck rear muffler because it is large and probably contains a lot of packing material. As an added bonus, it does not have any inside diameter reducing baffle and is completely straight through with a 90mm internal diameter the whole way. I must say that the car sounds awesome at 8,000rpm, but my neighbors probably want to shoot me when I start it up at 6AM.
Tomei Poncams Type-B 260°: Tomei Poncams are pretty much the standard RB26 cams today. I used to (I no longer work at a tuning shop) use the HKS 272° Step 1 cams, but the Tomeis offer similar performance at a lower cost. You can drop them in at 0°, but mad power can be made with cam timing changes on the dyno. The better your induction and exhaust system (from air filter to rear muffler), the more aggressive you can get on the cam timing. If your rear muffler has a 70mm baffle, it's time to cut it off. Internal muffler baffles are for the weak.
Tomei Valve Springs Type-A: You could use stock valve springs, but I don't really trust 17 year old valve springs for a higher than stock lift application with RPM. The Tomei springs drop right in and you can do the install with the head on the car if you have the right tools. These springs do not increase seat pressure by much, but they have a higher open pressure and are capable of more lift.

Tomei RB26 Adjustable Cam Pulleys: A must for maximizing power delivery. The pulleys also use high grade hardware to ensure the pulleys do not slip. The part of the pulley that is in direct contact with the belt is machined from “Duraluminum” which is what the Japanese call a certain 2000 series aluminum [I originally mis-wrote 7000, correction by Karl B]. The Tomei pulleys are colorful, but mine will be hidden underneath the front pulley cover. I'm not down with the flashiness at this age I suppose.

Tomei RB26 Oil Baffle Plate: Good for wet sump oil control. The RB26 has a giant pan and oil can slosh all over the place with sticky tires. Do most people need one? No, but if you regularly take your car to the road course, then you'll want one especially with sticky tires. If you're going to be dropping the pan, then it certainly wouldn't hurt to install a Tomei baffle either. Call it cheap insurance.

Tomei RB26 Oil Pump: The king of all wet sump RB26 oil pumps. Volume and pressure are stepped up tremendously, but pressure can be adjusted. Most people do not adjust pressure according to their build unfortunately and just plop them on the motor. All you have to do is read the Japanese instructions (what? you can't read Japanese?) that illustrate how to adjust oil pressure with a combination of springs and shims. The Tomei oil pump was designed to increase volume and sustain high pressures at 10,000rpm. Think about that if you're only revving to 8,500rpm or less. This pump was designed to be used with an enlarged sump oil pan too, but I've used it with stock sized sumps on several builds. To use this pump with a stock sump, you will need to use the orifice (below), unblock the oil drains in the cylinder head and block (usually there is casting flash that blocks oil draining), and to reduce the pressure at the pump's PRV. If you've got the extra funds, get a Greddy sump extension and make sure you have a professional welder weld it on (oil will seep through porous welds). If you've got plenty of extra funds, then go for the Tomei oil pan. But then if you're going to spend that much money, you might as well do it right and go for the Hi-Octane dry sump system. Screw wet sumps and accusumps. If you need an accusump, what you really need is a dry sump (if your race class allows them).
Tomei RB26 Oil Gallery Orifice: Not always necessary on a street car or car with stock or N1 oil pump, but very necessary in an engine with a big oil pump. Too much oil gets to the head without an orifice and the lame ass Nissan cylinder head oil drain passages are too small and often blocked from casting flash to drain all of the oil back into the pan. Believe it or not, the super long RB26 cylinder head only has four oil drain back holes (2x very front and 2x very rear). With excessive oil in the head, most of it will get pressurized into the valve cover vent hoses which means the oil will either end up in your catch can or the inlet of the turbos. Neither situation is very good for the lubrication system which requires that the oil is in your pan to work properly. Some people do the external drain mod at the back of the head, but the key is to not have any oil build up in the head to begin with. Funny how this $10 part can prevent catastrophic failures.

Tomei Type-A RB26 Fuel Pressure Regulator: I feel that you can never really have too much control with the fuel system. For this build I would have been fine with the stock regulator, but being able to adjust fuel pressure adds another dimension of control. The nice thing is that the Tomei regulator is a direct replacement for the factory unit and bolts right on to the factory fuel rail for a super sano install. I grabbed a brand new looking BNR34 fuel rail with no age stains and put the Tomei regulator on it for a super clean factory look. It is made for Tomei by one of the larger OEMs (Denso or JECS) so it also has the benefit of OEM type functionality and reliability which is more than I can say for many (not all) of the American racing fuel pressure regulators. Many of the American regulators do not hold fuel pressure when the engine is shut off which makes for sloppier and longer engine starting. When installing parts, you want an upgrade right? Why install something that doesn't even perform as good as a factory unit? When I use American racing regulators, I have found in my experience that only the Weldons hold fuel pressure when the engine is shut off.

Tomei RB26 In Tank High Flow Fuel Pump 276Lph: I believe Nismo supplies these pumps to Tomei, but guess what? It's cheaper from Tomei than Nismo so why not buy it from Tomei? With super high flowing drop in pumps Apexi, Nismo, and Tomei why even bother with those piece of shit Walbros? Walbros do not even have ball bearings in them. When's the last time you heard of a high speed, “high performance” armature assembly that did not spin on ball bearings? Walbros have bronze bushes believe it or not. If you think that's ok, then why not change out your throw out bearing and wheel bearings to bushes and see what happens? I recommend staying away from Walbros for the best reliabilty.
Tomei RB26 Strengthened Timing Belt: Who doesn't want a stronger timing belt with Kevlar reinforcement?
Tomei RB26 Stainless Exhaust Manifold Gaskets: The factory asbestos gaskets are ok with cast iron exhaust manifolds, but when using tubular exhaust manifolds for extended periods of time, you'll want to use some stainless exhaust manifold gaskets. On the street with heat cycling and on the track with sustained high RPM use, stainless exhaust manifolds expand and contract more than cast iron units so you'll want these multi-layer gaskets in place to keep the exhaust manifolds sealed to the head. Or if your engine is a massive horsepower drag car, I've actually seen the factory asbestos gaskets blow out from massive exhaust back pressure. Consider these cheap insurance to prevent the unnecessary removal and reinstallation of the turbos. As another plus, these gaskets are reuseable if they are in good shape.
XS Engineering GT-R Intercooler Core Assembly: Unfotunately XS does not make this intercooler assembly any longer. The foundry in Japan that used to cast their end tanks went belly up. This core remains one of my favorites because it's tube and fin construction makes it lighter and more efficient than that piece of shit made in China boat anchor you were thinking about buying for $300. If I had to buy one today, I would get myself a Greddy Type-R or a Blitz LM. It's all about lightweight tube and fin cores that are effective. Stay away from the melted pots and drains from China.
Nismo Engine & Transmission Mounts: 17 year old mounts just aren't going to cut it. If you're pulling the trans or engine, make sure you replace them with the Nismo mounts. They are a tad stiffer than stock and most of all, they are not 17 years old. If you want even stiffer or solid mounts, you'll need to fabricate them yourself or get them from one of the smaller JDM tuning shops like Garage Saurus or Endless (not the brake company).
Nismo RB26 70mm Air Flow Meters x 2: These are direct replacements for the factory MAF units, but their hot wire sensors are recalibrated for higher power applications. A pair of these MAFs is good for about 800hp. I used these because I am using the factory airbox and needed factory replacement MAFs. Nismo originally developed these for N1/Super Taikyu endurance racing so chances are they are plenty good for my car.

Cosworth Air Filter, drop in: I was directly involved with the development of the filtration media used in the Cosworth air filters so I had to put my money where my mouth was. Luckily the Cosworth filter did not disappoint because the car ended up making over 500hp at the wheels (more details in part three) on 91 octane pump fuel. The beauty of this filter is that it maintains 98.6% filtration efficiency which pretty much matches the factory paper filter's efficiency. It blows away a cotton gauze filter's efficiency by over 6 points and destroy's a washed cotton gauze filter's efficiency by over 20 points. Fun fact: the same air filter fits: Nissan 1989-02 BNR GT-Rs, 1978-06 Maxima, 1978-96 280ZX-300ZX all, 1991-07 Subaru Impreza all, 2003-06 350Z/G35, etc. Nissan and Subaru pretty much used the filter for all EJ20, some EJ25, VG, VQ single throttle, and later L28 applications. I have this same 500+whp capable air filter in my 96 Maxima and my mom's 05 G35.

RC Engineering 750cc x 6 Fuel Injectors: I had these injectors sitting in my Snap-on box forever. I asked Keoni at RC to give them a cleaning and checking. I probably should have used 1000cc injectors (I ran out of injector as you'll read in part 3), but sometimes you can't beat free.99. The people at RC Engineering are always friendly and you can't beat their quality of service and turn around times.

APEXi Power FC L-Jetro: While I haven't worked at Apexi now for 9 years, I still love the simplicity and power of the Power FC ECU. The base map and fixed data is so good that while it doesn't offer full control (neither do many other standalones), many of the non adjustable parameters are engine specific (in this case RB26) and work well even with extensively modified engines. I'm talking about parameters that are often overlooked such as idle ignition timing, timing during cranking, air temp correction at idle, etc. I chose the L-jetro (=MAF) because tuning a turbo engine on individual throttles is a BITCH. At different throttle positions fueling is a BITCH. At different boost levels fueling is a BITCH. At different throttle positions and boost levels, fueling is an ABSOLUTE BITCH. And to top it off, go up a hill 300 feet in altitude and without barometric compensation the end result is total shit. To do D-jetro (no MAF speed density) correctly on a turbocharged engine with individual throttles, you'll need to use an ECU that has a fuel map that is load (boost) vs. speed (rpm) vs. throttle position vs. barometric pressure. The throttle position correction map needs to be extremely high resolution (at least every 10% throttle position and match the engine speed breakpoints on the main fuel table). The barometric compensation map needs to be fairly high resolution also (ideally every 40 millibar). If you don't use an ECU with these capabilities (such as an HKS F-Con V-Pro, Motec, Pectel, etc.), then your entire fuel map is a compromise and it will suck big time. Sound like a clusterfuck? Well that's because it is. So for turbocharged indvidual throttle engines, I prefer to use MAF sensors which are physically measuring air flow rather than a calculated estimate (speed density) that needs to be corrected by two other maps. Not only does it make life much easier, but you'll end up with a better finished product that drives and performs better. Some car companies that use air flow metered individual throttle engines are Ferrari, Lamborghini, BMW, Mercedes, Aston Martin, etc. Need I go on? In stage 2 of my build, I will be moving on to a Pectel SQ6M ECU, but for now the Apexi Power FC L-Jetro is controlling everything perfectly.
Koyo Aluminum Radiator: A free.99 part I had sitting around or I was given (I do not remember). Koyos work well for the money and they benefit from Japanese quality control. The only thing you have to look out for is the stamped water neck. These can go bad on occasion and you'll find yourself chasing a cooling issue.
Toyota FIPG Seal Packing Silicone (oil pan): This is the best damn silicone available to humans for oil pan sealing. That is all.

XS Engineering RB26 Bronze Valve Guide Set: Bronze manganese valve guides that are able to handle sustained high rpm usage. The factory cast iron guides often crack even in engines with factory redlines. Back when I was at XS, I got tired of paying JDM prices for bronze guides. On the other hand, most American manufactured guides had shitty manufacturing tolerances. So we ended up machining our own. By “our” I mean XS when I was there. I used to use these guides in every RB26 cylinder head that went through the shop because almost all of them had cracked factory guides.
Nissan OEM throttle body and intake manifold gaskets (paper): The paper gaskets work fine for just about any build except for super big boost drag applications where a backfire can blow out a gasket. Since my build is not a super big boost build, I'll be using the factory paper gaskets which also have the added benefit of being dirt cheap. I would use paper gaskets for any build under 2 bar (29psig) of boost.

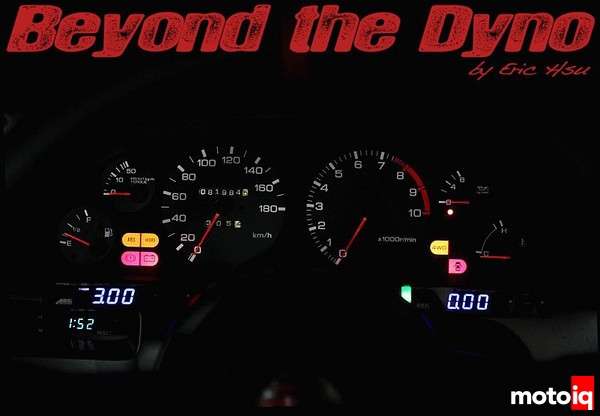
ARK Design MFD (Multi Function Display): I fabricated a quick and dirty mount out of aluminum for the MFD (see above) that tucked right underneath the center console trim. It turned out to be surprisingly solid. Anyhow, the MFD is nice because it basically replaces a bunch of gauges that would make your car look like you built it in the late 90's/early 00's and copied a car straight out of the pages of Super Street Magazine circa 1999-2003 or one of the Fast & the Furious movies with gauges lined up and down your A-pillar or across your entire dash. Having a bunch of gauges is great in concept becuase it's nice to have all of the data in real time, but it just looks dated with gauges all over the place. The ARK Design MFD does an excellent job of integrating 10 guages into a small display with a super bright LCD display that does the job even in direct sun light. I think ARK just released the MFD2 that is great for OBD2 cars with a one plug installation. For older cars like this one, you'll have to directly connect the MFD to your engine harness, but you are rewarded with the real time sampling rates of an analog ouput.

ARK Design ABC (Advanced Boost Controller) & RST (Rev-Shift Timer): To the left of the is the Rev-Speed Timer which is a turbo timer with a shift light function. On the right is the ABC which is an extremely simple to use boost controller. I pretty much leave the timer on at 1 minute most of the time unless I either did a late night top speed run or just cam off track. The ABC allows for two boost settings and is super easy to use. I had the option of using the Power FC to control boost, but I figured I would give the ABC a try. For a simple boost controller, it does a pretty damn good job at bringing up boost ultra quick and keeping it stable throught the revs. The RS-T and ABC look a little old school right out of the box so that worked out really good with this car because it IS an old school car.
Ogura Racing Twin Plate Clutch: This is one of the clutchs I had in my collection of random parts. It was either this twin plate Ogura, a triple plate Exedy, or a quadruple plate OS Giken. I fel the twin plate Ogura was ample for the task. I have used Ogura clutches in the past with good results.
KAAZ LSD 1.5 way (16 plates): Being that XS Engineering used to share a building with Ray and the KAAZ guys, I pretty much went to KAAZ first for an LSD. Before installing, I had Peter disable 8 of the plates since I wasn't planning on doing any drifting anytime soon. I also had a fresh pair of stub axles installed. They are cheap from Nissan in Japan so I figured a little cheap insurance wouldn't hurt.
HKS Hipermax ProPerformer coilovers: These were the top of line coilovers from HKS Japan back in 2005 and they worked surprisingly well on the XS Engineering BNR32 GT-R time attack car. When the XS GT-R got upgrades to KW Motorsport triple adjustable racing dampers, I basically proclaimed the HKS dampers mine. Nobody complained then so they are on my car now. I returned the spring rates back to the original HKS rates which I believe are 12kgF/10kgR.


Peak Performance rear upper control arms & pillow upper links: The BNR32 rear suspension is very similar to that of an S13 240SX and uses many of the same bushings, arms, and links. My long time buddy Eddie Kim at Dynamic Autosports hooked these up at a killer price so I almost didn't have a choice. They fit and work awesome. The deal closer for me was that Peak uses made in the USA Aurora heim joints and bearings in all of their arms. Since this car isn't a daily driver for me, my long term plan is to remove every single rubber bush and replace them with solid delrin bushes and spherical bearings in the suspension and chassis. I love the crisp and direct feel of non-compliant suspension and subframes.
XS Engineering Custom Rear HICAS eliminator arms: This is basically Peter removing the rear HICAS steering rack, fabricating some brackets and misalignment spacers, and taking some threaded rod with some Aurora heim joints on them to eliminate the HICAS system.
Nagisa Auto Billet Front lower arms: The Nagisa arms are made out of billet steel which makes them super heavy duty, but it also makes them quite heavy. I have used these on quite a few builds in the past and have had good results with them although the camber adjustment is a total pain in the ass. But then again the BNR32's entire front suspension geometry is a pain in the ass too. Kojima and Mitchell told me that the BNR32's suspension was designed before Nissan started using Cray supercomputers (what it took to model suspension geometry back then) and they basically fucked it up big time. I happen to agree very strongly. The Nagisa arms in the hands of a capable suspension guy not only gives you camber adjustment, but can also widen the front track a tad.
Nagisa Auto Roll Center Spacers: These are bespoke pieces that attempt to fix roll center irregularies brought on by lowering the car's ride height. They fit in underneath the front uprights where they meet the lower arms. They do help to bring the lower arm closer to where it should be, but unfortunately it does make the BNR32's super short upper arm angle even more extreme. I'll have to take it to the track one of these days to figure out which is the lesser of two evils (jacked up lower arm angle or jacked up upper arm angle). I'll need to make sure I happen to go on a day when Kojima is there hahah.
Nagisa Auto Outer Tie Rods: Aside from being lighter than stock, but probably just as robust to deal with curb hopping at the track, they also attempt to fix bump steer issues brought on by lowering the car's ride height.

D. Speed Clear Corners: As it is the burgundy BNR32 is the red headed step child of all of the BNR32 factory colors so I attemped to clean it up a bit with a pair of clear corners from D. Speed Japan.
That's all for now. If I left anything out, I'll be adding it later. Part 3 should be arriving sometime in the next month or so.