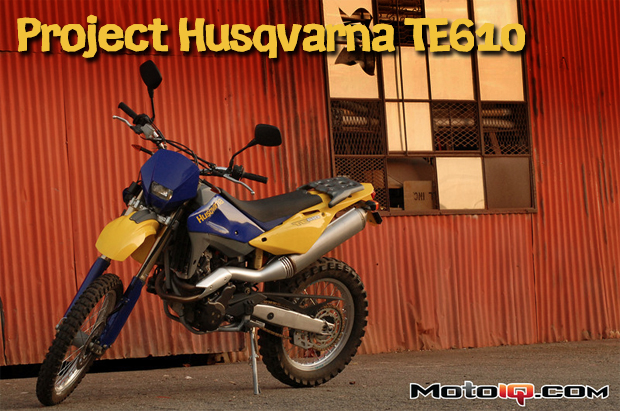

Project Husqvarna TE610 Part 2: Dual Sport Adventure Bike Fundamental Fixes
By Dan Barnes
As outlined in Part 1, if a Husqvarna TE610 matches the description of the bike you want, then there really isn't any other bike that does. After traveling half way across the country in a metal tube to buy this one, I couldn't wait to get out and ride it in some open spaces. But things didn't go the way I expected when I got the Husky into my garage and started prepping it. The plan was to get the bike home, change the oil, clean the air filter and chain, and go ride. As I stacked up miles, I'd gradually work on getting the setup dialed in and durability enhancements added. But with the grease and dirt removed, I could actually see the chain guide, and something was obviously not right.
 |
| The chain guide is an aluminum frame with a plastic slider block that feeds the chain onto the rear sprocket. It should be centered on the sprocket, but on this machine, it was outboard of center by 0.10 inch. |
Misaligned chain guides are not uncommon on dirt bikes, but they usually get that way by crashing, which moves the guide toward the center of the bike. The parallelism relative to the rear sprocket and lack of impact damage or scratches on the chain guide, or anywhere else on the bike, pointed to this being a factory defect. In less than 700 miles, the chain had worn through the plastic and was about to start nibbling on the aluminum. You could also see evidence of accelerated wear on the inner plates of the chain and the inboard face of the rear sprocket. A web search revealed that a misaligned chain guide is common enough to be unsurprising on TE610s. It is likely related to the number of low-mileage chain breaks on TE610s, which can destroy the engine case on a bad day. Correcting the chain guide alignment became priority number one before putting more miles on the bike.
 |
| Thanks to Zenith Performance Fabrication, Project TE610's chain guide is now centered on the rear sprocket within a few thousandths of an inch. |
Enter Zenith Performance Fabrication. By day, Matt Weiss works for a little brake company you might have heard of, but before that, made his living building race cars. I tried to find a less involved solution, but eventually agreed with Matt that the best way to fix the chain guide would be to relocate the bracket on the swingarm. After everything was thoroughly cleaned (there's clean enough to see, clean enough to eat off of – and then there's clean enough to weld), Matt machined a fixture to hold the chain guide centered on the rear sprocket. We ground the bracket off the swingarm and welded it back on, perfectly aligned. Needless to say, the welds are beautiful.
 |
| The chain guide bracket and cage are basically two aluminum channels bolted together with just this soft plastic between them, resulting in substantial deformation when the main bolt is tightened and possibly inducing new alignment error. Matt made an aluminum spacer to support the two legs of the bracket. Instead of a long, gradual tightening (“I wonder when I should stop?”), the nut now snugs up the way you'd expect when everything clamped is metal. Most importantly, geometry is maintained. It did require enlarging the hole in the new chain guide plastic – I used a Unibit. |
Not knowing how much damage had been done to the original chain, I replaced it with a DID X-ring chain, buying a couple clip-style master links, which can be serviced on the trail with a small, easy-to-carry and inexpensive tool. I also installed a Renthal 14-tooth front sprocket, dropping one tooth from stock, to help out on challenging off-road terrain. Comparing it to a $10 front sprocket, there's no question the $20 (“street price”) Renthal is more than twice as nice. All surfaces that contact the chain are much smoother and there are reliefs at the bottom of the notches so debris will tend to be removed, rather than building up.